CosmosEx config tool
CosmosEx device comes with a tool called CosmosEx config tool. When you don’t have the device configured, it appears on ACSI ID 0, on the first boot loads the CosmosEx disk driver (CEDD) and makes drive ‘O’ available in TOS – this drive is called ‘config drive’. To run the CosmosEx config tool, add a drive with letter ‘O’ in your desktop, open it and run ‘CE_CONF.PRG’.

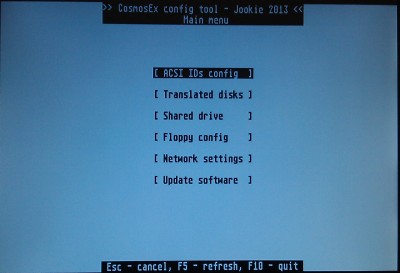
The CosmosEx config tool has a main menu which contains the items you can configure. To quit the CosmosEx config tool use the F10 key.
ACSI configuration
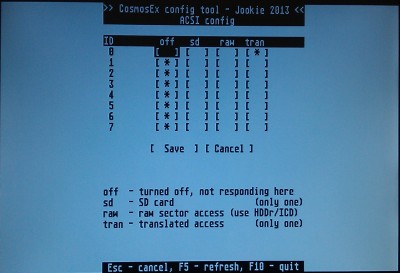
Use this screen to assign ACSI IDs to CosmosEx device. The rules and limitations are as follows:
- you can have only one ACSI ID assigned to SD card as there’s only SD card slot.
- you can have no ACSI ID assigned to SD card and then it won’t be used – you won’t be able to use it until you assign an ACSI ID again to it
- you can have only one ACSI ID assigned to translated drive – this will be used to boot the CosmosEx disk driver
- depending on the order of SD card and translated drive the drivers will boot in that order from those drives, e.g.:
- ACSI ID 0 for translated drive, ACSI ID 1 for SD card with HDDRIVER – first the CosmosEx disk driver starts, then HDDRIVER starts
- ACSI ID 0 for SD card with HDDRIVER, ACSI ID 1 for translated drive – first the HDDRIVER starts, then it won’t let CosmosEx disk driver to start
 But you can have the CosmosEx disk driver in the AUTO folder on the SD card, and this way the CosmosEx disk driver will load…
- you can have from 0 to 8 raw sector access drives (if you already used some ACSI IDs for other things, then you can have less than 8 raw sector access drives). These are used for raw sector access on any USB media you will connect to USB slot of the device, and you will need some hard disk driver (HDDRIVER or ICD Pro) to access these drives.
- if you set the ACSI ID to ‘off’, then CosmosEx won’t respond to commands on this ACSI ID – usefull when the ACSI ID is used for something other. You can’t have all the ACSI IDs off – that way the device wouldn’t be reachable through ACSI port, so enable at least something…
Translated disk
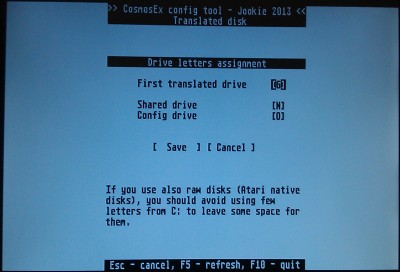
In this screen you set the TOS drive letters which you want to use with CosmosEx disk driver:
- shared drive letter – used for shared drive – a folder shared from Windows or Linux (Samba or NFS)
- config drive letter – this drive contains the configuration tools and drivers, when is set, the default value ‘O‘ is used
- first translated drive – you specify the lowest drive letter which will be used with translated disks, e.g. you have 3 partitions on the SD card, so they will be visible under TOS as ‘C‘, ‘D‘, ‘E‘, so you set the first translated drive to ‘G‘, and when you connect the first USB drive (DOS formatted), it will appear as ‘G‘, the next USB drive (DOS formatted) will appear as ‘H‘, and so on.
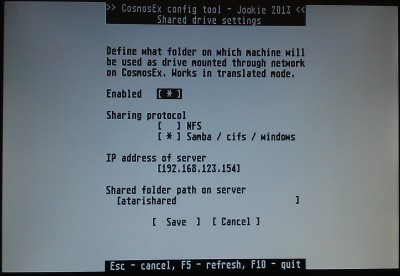
Shared drive settings
If you want to use a shared folder from your PC as a drive on your ST, you have to configure this stuff:
- enabled – mark this one to use the shared drive
- sharing protocol:
- Samba / cifs / windows – if you just shared a folder from Windows using windows sharing. You have to share this folder as full access (read / write) and no username and password
- NFS – if you shared a folder from linux using NFS protocol, or you can use some application under Windows for this purpose (e.g. HaneWIN NFS Server)
- IP address of server – the IP address of the machine on which you shared the folder
- shared folder path on server:
- for samba / cifs / windows use the name of the share, e.g. ‘atarishared‘ (this is what you see when you open your computer through network neighborhood)
- for nfs – this is the path where the shared folder is:
- under linux – something like: /home/joe/atarishared
- under windows, using HaneWIN – the shared folder is C:\atarishared, but you write /c/atarishared
This shared drive is accessible when you are using CosmosEx disk driver.
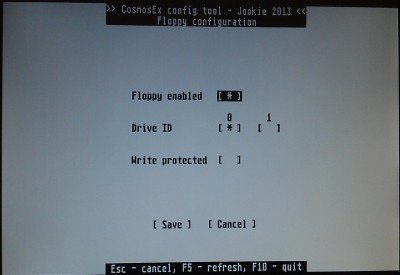
Floppy configuration
- to enable or disable the drive, use the ‘Floppy enabled’ checkbox
- to select the drive ID select the appropriate checkbox (0 or 1)
- to write protect your floppy, check this last checkbox
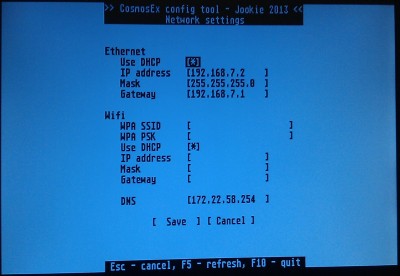
Network settings
The network settings are mostly self explanatory for people who – at least once – have set the network settings on their computer ![]() The wifi part hasn’t been tested, so for now use the ethernet part only. If you do have a router in your network, check the ‘Use DHCP’ checkbox and the network configuration will be pulled from that router (this is the default settings). If for some reason you want to set the configuration manually, uncheck the ‘Use DHCP’ checkbox and enter the configuration manually.
The wifi part hasn’t been tested, so for now use the ethernet part only. If you do have a router in your network, check the ‘Use DHCP’ checkbox and the network configuration will be pulled from that router (this is the default settings). If for some reason you want to set the configuration manually, uncheck the ‘Use DHCP’ checkbox and enter the configuration manually.
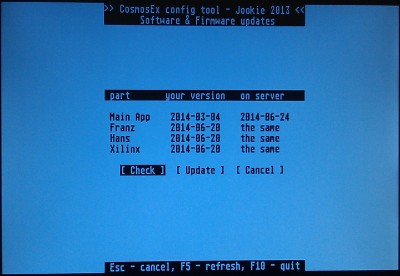
Software and firmware updates
This screen serves for updating your device to newer versions of software and firmware. You can see your current software versions in the column ‘your version‘, and you can see the versions available on server on the column ‘on server‘. To update all components which have newer version on server, press the ‘Update‘ button and wait a couple of seconds… You will see a downloading screen, and then you will loose the connection to the device for a while (you will see a screen saying ‘Connection lost’ or something similar). Wait few seconds (hopefully less than 2 minutes ![]() ), don’t power off your device, and the main menu of this config tool should appear again. When you go to the updates screen again, all the components should have text ‘the same‘ in the ‘on server‘ column.
), don’t power off your device, and the main menu of this config tool should appear again. When you go to the updates screen again, all the components should have text ‘the same‘ in the ‘on server‘ column.
Please note that a working connection to the internet is needed for these updates, as the new updates are located on my web server.